TomTom 4LB00 Video Camera User Manual TomTom Bandit

When the battery sti ck is charged, insert t he battery stick i nto the camera and turn it u nt il it locks.
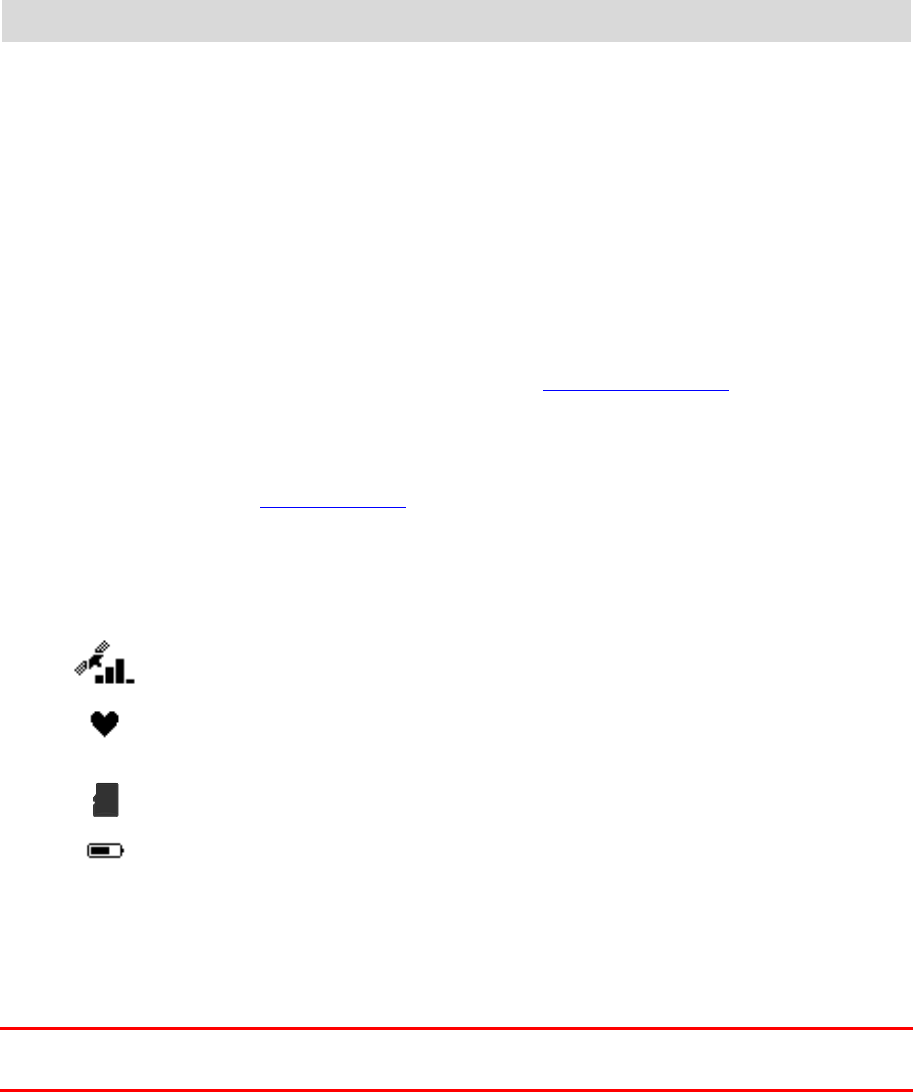
Charging the came ra using the optional powe r cable
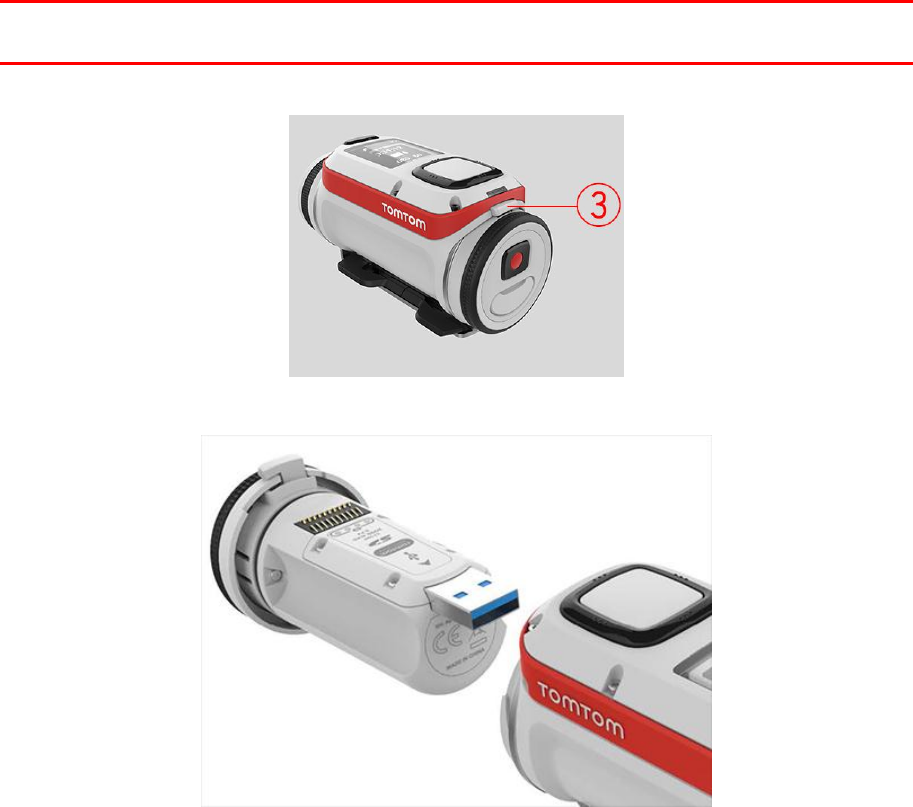
Open the connecto r cap on the back of th e battery stick.
NOTE TO GERRY: we n eed to replace this ima ge with a cleaner one : -)
Tip : You don't have to r emove the battery sti ck from the camera .
Connect the powe r cable to the battery stick connector and to a USB socket .
QUESTION for REVIEW ERS: How do you know wh en the battery is full for t his method??
Inserting a memory card
The photos you tak e and the videos you recor d are stored on a micro - SD m emory that is located in
the battery stick .
Inserting a micro -SD memory card into the battery stick
Important : If you r emove the battery stick be extra careful not to let dirt or water enter t he
camera or the batter y stick. Only remove the battery stick i n clean and dry co nditions.
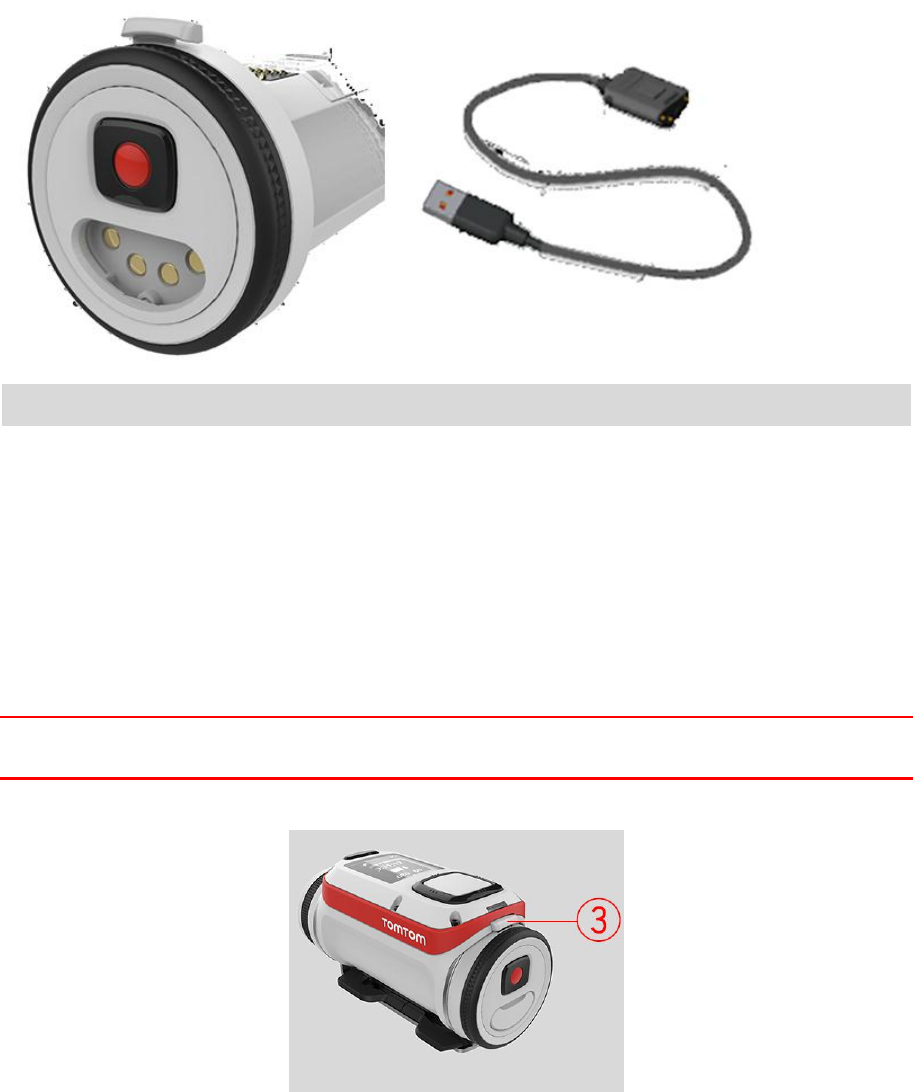
Press the battery stick release button as s hown below (button 3).
Turn the battery stick to remove it from yo ur camera.
Insert the micro -SD memory card into the memory card slot in t he battery stick.

NOTE TO GERRY: we n eed to replace t his image with a clea ner one :-)
Insert the battery s tick into the camera an d turn it until it locks.
Note : If you insert a mi cro-SD card that is too slow to wo rk with your camera, th e camera shows
you a message and yo u are asked to use a s upported micro-SD card .
Tip : Micro-SD cards ca n degrade over time , and performance may suffer a s the memory card fills
Setting up
Note : The language yo u choose will be us ed for all text on the sc reen. You can always change the
language later in La nguage and U nits in the Settings menu.
When you first switch o n your Bandit, yo u have to answer a few q uestions to set it up. Answ er the
questions by pressing th e button to move up, dow n, left or right on th e screen.
Tip : You do not need to connect you camera t o the in ternet or to the mobile application to set it
up for first use.

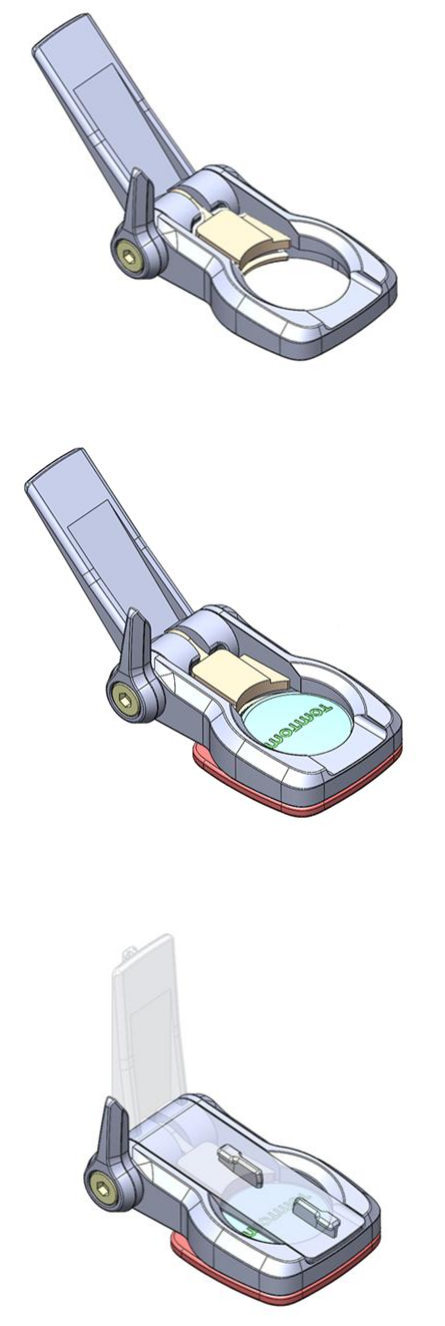
Using the universal mount
You can mount your camera in many plac es, for example on your hel met or on the handlebars using
the optional bik e mount.
EMAILED GAVIN FOR BETTER IM AGE
The universal mount kit lets you mount your ca mera on a helmet or oth er flat or slightly curved
surface. The kit co ntains the universal mou nt and two adhesive discs .
1. Attach the adhesive dis c to your chosen surface. Firm ly press it into place to e nsure f ull contact
over its entire surfa ce.
Follow these tips to ma ke sure that the ad hesive disc is secure:
Apply the adhesive disc o nly to a clean and dry surface. Wax, oil, dirt and mo isture reduce
adhesion, which can res ult in a weak bond.
Attach the adhesive disc in dry, room -temperature co nditions. The adhesive disc won't be
secure if you attac h it in damp and cold conditions .
Attach the adhesive disc only to a smooth and hard surface. The adhesi ve disc won't secur e-
ly attach to porous, tex tured or soft surfa ces.
Regularly check the sec urity of the adhesive disc .

2. Attach the universal mou nt to the adhesive disc by fi rst fully opening the mo unt.
3. Push the mount onto the di sc at any yaw angle until you hear a click.
4. Fold down the camera p latform to any angle b etween 90 degrees t o horizontal and fully c losed.
This locks the mo unt to the disc.
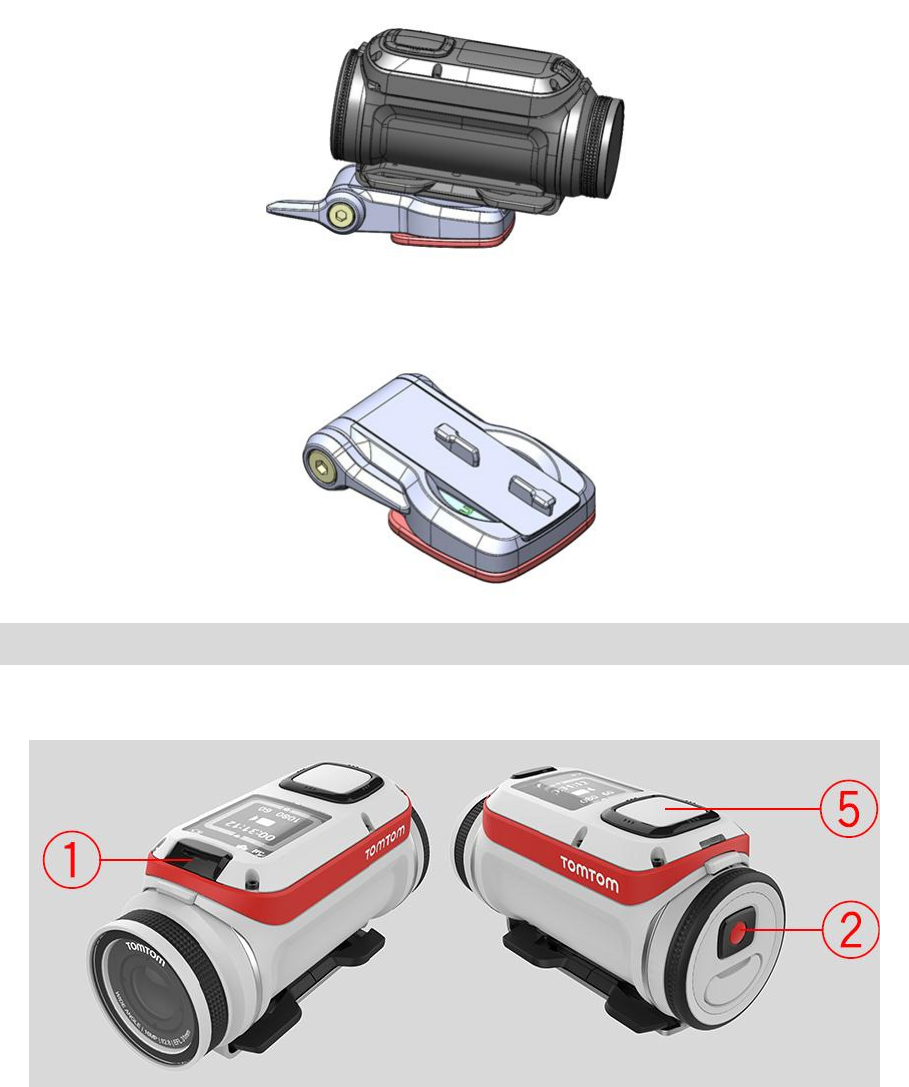
5. Mount the camera on th e camera platform.
6. Push down the lever to lock the mount.
Note : To remove th e mount, reverse the abo ve instructions.
Switching on and off
Switching on you r Bandit
Press the START b utton (button 2) at the back of the camera for 2 s econds to switch your came ra
on. If no SD card is inserted into the batt ery stick, you are aske d to insert one so that t he camera
can switch on.
If the camera is in st andby mode, press the control button (button 5 ) to wake up the camera .
Switching off your Ba ndit
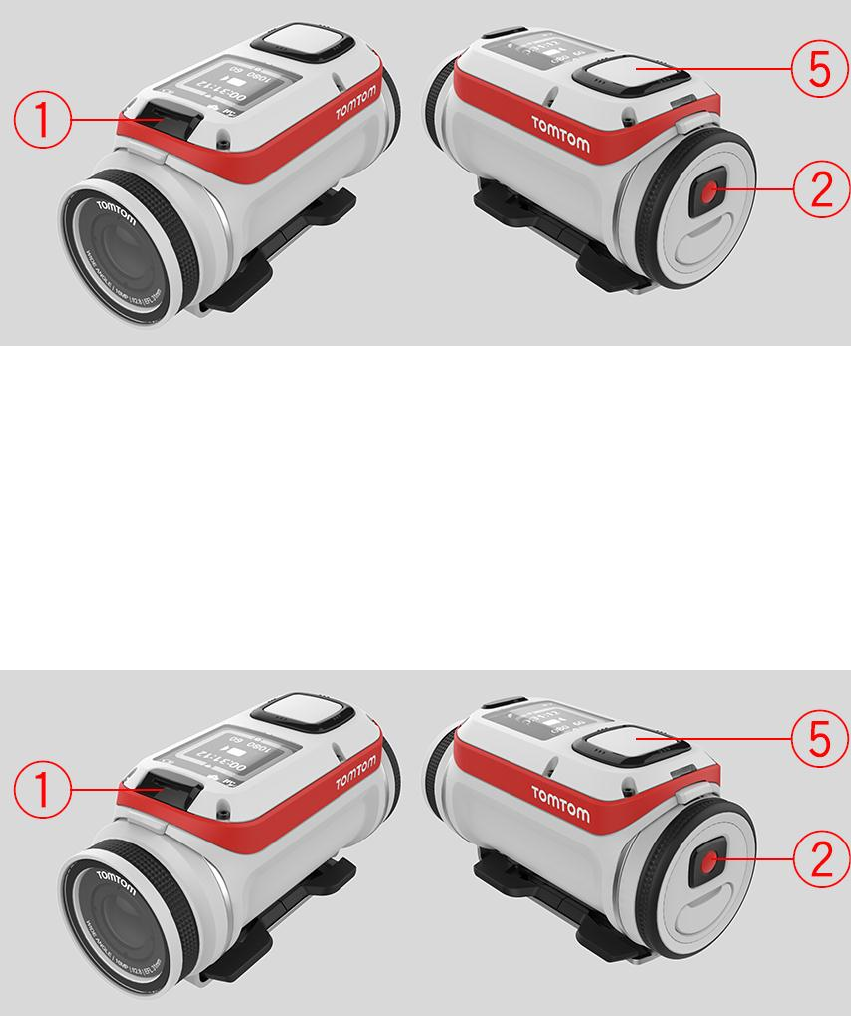
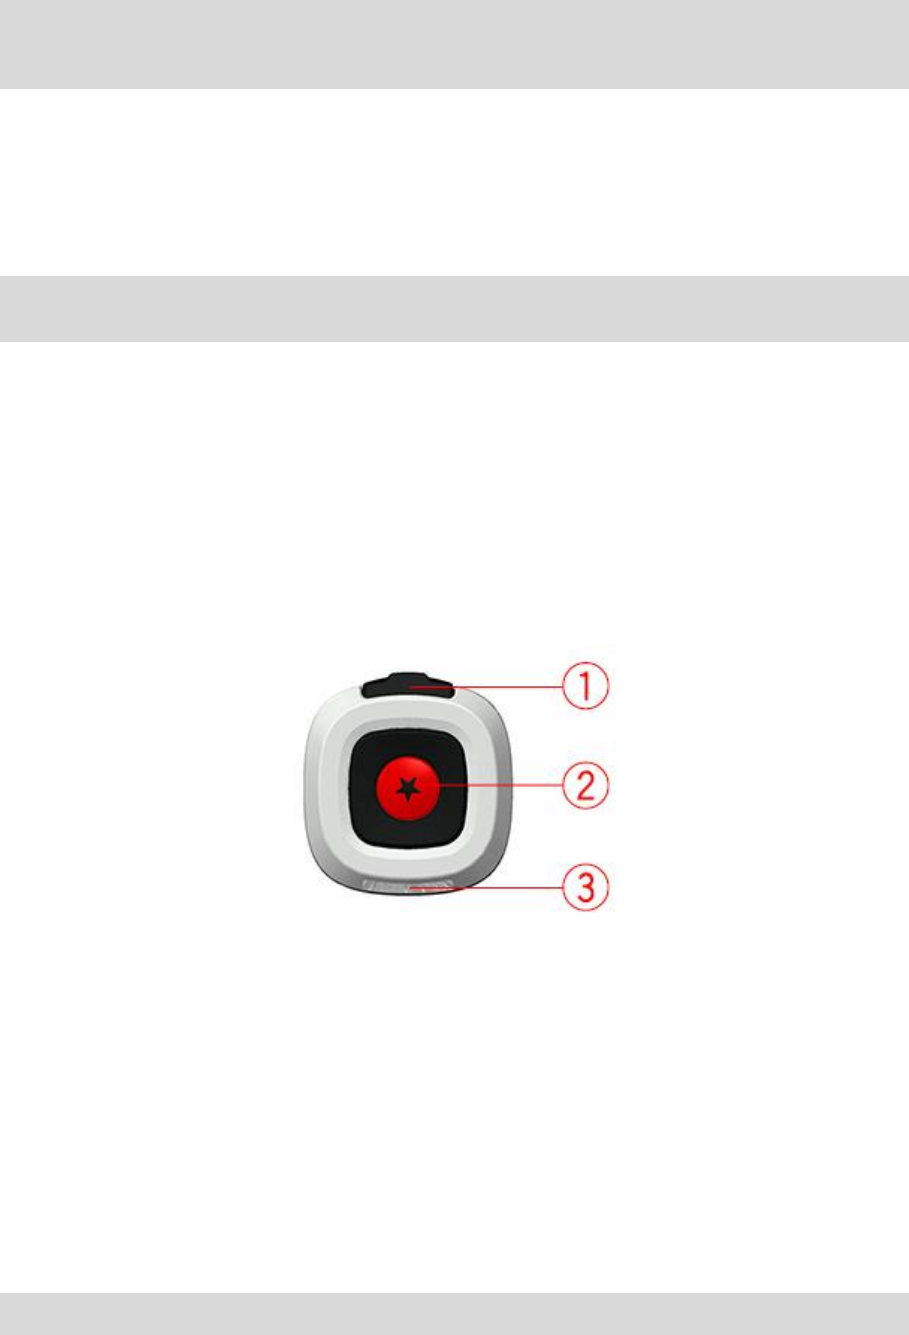
Press the STOP butto n (button 1) at the front of the camera for 2 secon ds to switch off the came ra.
Start recording
When your camera i s switched on or in standby mode, press th e START button (button 2) to s tart
recording in your c urrently selected mode, for example video recording or photo burst. When yo u
camera is recordi ng, red LEDs in the START an d STOP buttons flas h.
Press the START b utton agai n to tag your video.
Stop recording
Press the STOP butto n (button 1) to stop recordi ng and go back to sta ndby mode.
Tagging a video
During recording , you can manually add a tag or highlight to your video.
You can add a tag w hen something exciting or m emorable happens such as reaching a fas t speed, or
crashing. Or you cou ld tag a beautiful view or t he highest peak on a walk .
You can easily creat e videos from your tags by using the TomTom MOBILE APP or the T omTom
DESKTOP APP.
Automatic tags ca n be added to your video t hat include action metrics , for example speed, cra shes
To add a tag man ually, press the START butto n (button 2).

Your camera
Getting started
Before you start maki ng videos, it's a go od idea to charge your camera, download any s oftware
updates and down load QuickGPSfix.
Note : QuickGPSfix h elps your camera get a GPS fix and find your locatio n quickly.
1. First, charge your .
2. Register your camera at mysports.tomtom.co m . You need your cam era's serial number to do
After your camera is charged, you can record a video.
You should connect yo ur camera to your comp uter regularly to charge it , upload videos and photo s,
download software up dates and download QuickG PSfix information.
Battery life
When the battery is fully charged, your cam era can be used for up to th ree hours of a ctivities that
need GPS reception , such as running and cyc ling. The battery is used mo re quickly if you use the
LED lights on your cam era all the tim e, or connect the came ra to sensors, such as the Heart Rate
The following tips wi ll help your camera go longer on a battery charge:
Turn off the LED lights when you don't need them.
Turn off sensors that yo u are not using. Your camera keeps sea rching for sensors even if you are
not using a sensor.
TomTom Bandit CAM ERA APP
Important: Before usng the mobile camera a pp on your smartphone , you need to link your cam era to
your MySports accou nt using a computer. This needs to be done only once.
You can download th e TomTom Mobile Camera ap p for free from your usual ap p store or by going to
tomtom.com/app .
To learn more, go to MOBILE APP in this guid e.
Pairing your came ra with your p hone
To learn more, go to Phone in this guide.
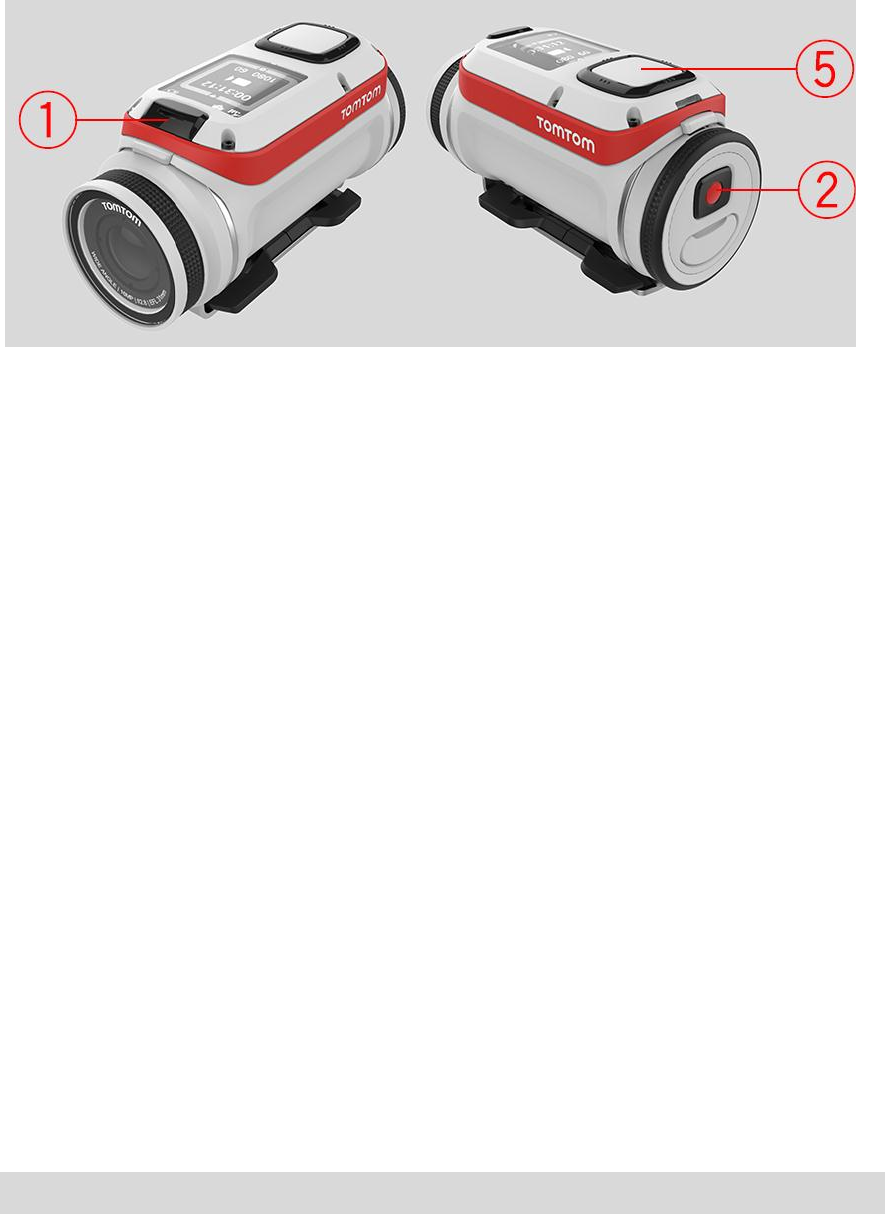
About your camera
Your Bandit is a modu lar construction that i s easily disassembled so you can swap parts, for exa mple
to install a new batt ery stick or replace t he lens cover.
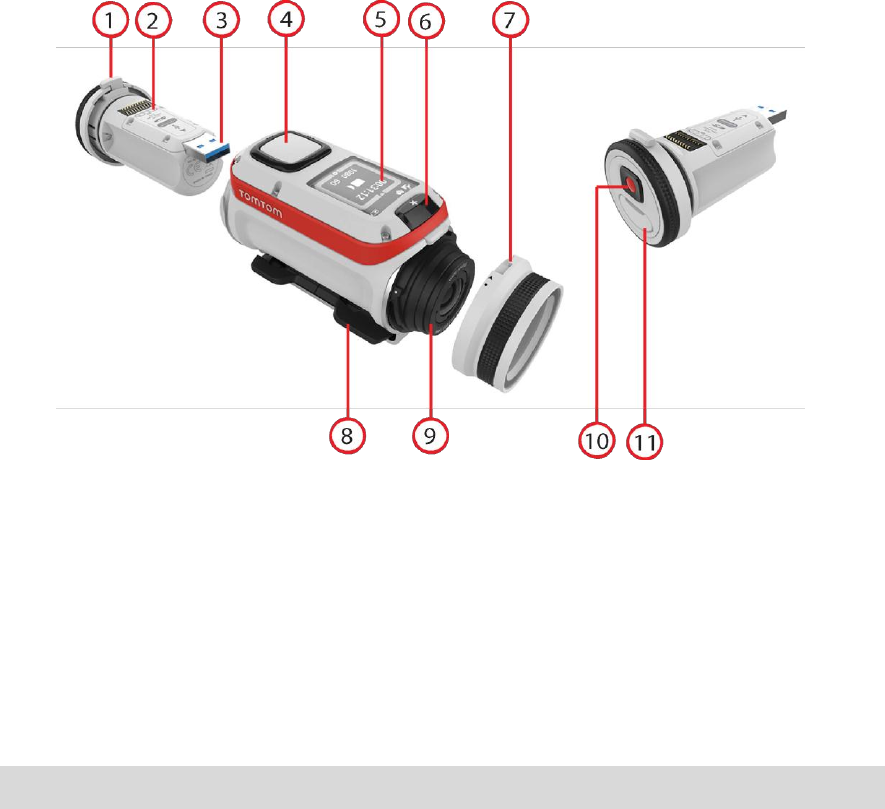
1. Battery stick.
2. Power indicator.
3. USB connector.
4. Control button to move up, down , left or right to other scree ns on your camera dis play:
Move up or down to se lect items in a menu .
Move right to select a n item and open the me nu for that item.
Move left to exit a menu.
To select an option i n a menu, make s ure it is highlighted when you leave the menu. Your
camera rememb ers the option you highlighte d.
If an option in a men u switches on and off, move right to change the setti ng.
Note : The control button is disabled when you use the cam era deep underwater .
6. STOP button.
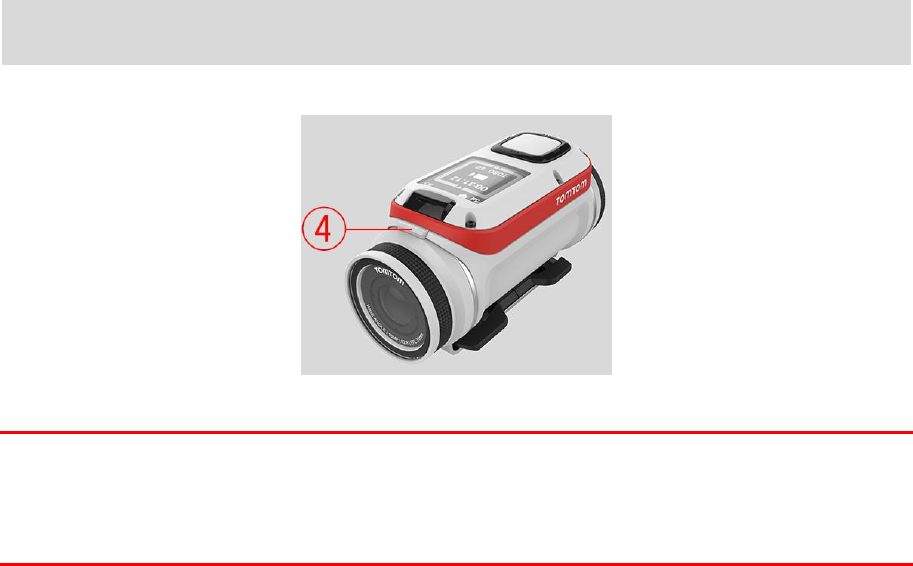
7. Lens cover. The camera is w aterproof with the standa rd IPX7 lens cover. If you wa nt to use the
camera underwat er to depths down to 50 m, install the optional IP X8 lens cover.
8. Camera mount.
10. START button
11. Connector for optional power cab le.
What's on the screen
The camera screen lets you select the type o f video or photos you want to record, and let's you
change the settings f or each video and photo mo de. You move to other scr eens using the control
button by doi ng the following:
Move up or down to se lect items in a menu .
Move right to select a n item and open the me nu for that item.
Move left to exit a menu.
To select an option in a m enu, make sure i t is highlighted when you leave t he menu. Your
camera rememb ers the option you high lighted.
If an option in a men u switches on and off, move right to change the setti ng.
Note : The control button is disabled when you use the camera deep unde rwater.
You can see the fo llowing screens:
Camera Status
The Camera Stat us screen is shown wh en you are not recording v ideos or
photos. This screen s hows the mode and the sp ecific settings you have
Mode screen
The Mode screen lets yo u choose the mode yo u want use. The modes a re
Photo, Video, Slow Moti on, Time Laps e, and Cinemati c.
Recording screen
The Recording screen is s hown when you are recor ding a video or taking
photos. The screen s hows you the remaining time you can still record, an d
the time you have al ready recorded, or th e number of photos taken .
Settings screen
The Settings screen lets you changes the setti ngs for the selected mo de
and the general setti ngs for the camera.
Selecting Status wi ll shown you the status of the cam era .
Video and Photo
For each Video a nd Photo mode you can set different settings to
customize the vi deo or photo. For examp le, you can set the frame rate,
the lens angle, and t he scene.
General settings
The General setti ngs set the options f or the camera, for exampl e
Language, Units an d Sound.
Icons on the Came ra Status screen
The following icons may be shown along the top of the Camera Status a nd Recording screens:
This symbol shows the st rength of GPS receptio n. While your camera is
looking for GPS satel lites, the satellite image flash es.
The heart symbo l shows that your camera is connected to a Heart Ra te
Monitor. When your camera is trying to connect to the Heart Rat e Monitor,
the heart flashes .
This symbols shows t hat a memory card is inse rted.
This symbol shows the battery status .
Charging your camera
You can charge you r Bandit in the following two ways:
Charging the batter y stick using a USB socket
Important : If you r emove the battery stick be extra ca reful not to let dirt or wa ter enter the
camera or the batter y stick. Only remove the battery stick in clean a nd dry conditio ns.
Press the battery stick release button as s hown below (button 3).

Turn the battery stick to remove it from yo ur camera .
Insert the battery s tick USB connector i nto your computer's USB so cket or a standard USB
wall-charger.
Tip : While the battery sti ck is charging, the LEDs s how the charge leve l and one LED flashes.
To see the power level of the battery stick , remove t he USB connector from the USB charging
socket, then press th e START button. The LEDs light up to show the power level.
When the battery sti ck is charged, insert t he battery stick i nto the camera and turn it u ntil it locks.
Charging the came ra using the option al power cable
Open the connecto r cap on the back of th e battery stick.
NOTE TO GERRY: we n eed to replace this ima ge with a cleaner one : -)
Tip : You don't have to r emove the battery sti ck from the camera .
Connect the powe r cable to the battery stic k connecto r and to a USB socket.
QUESTION for REVIEW ERS: How do you know wh en the battery is full for t his method??
Inserting a memory card
The photos you tak e and the videos you recor d are stored on a micro -SD m emory that is located in
the battery stick .
Inserting a micro -SD memory card into the battery stick
Important : If you r emove the battery stick be extra careful not to let dirt or water enter t he
camera or the batter y stick. Only remove the battery stick in clean a nd dry conditio ns.
Press the battery sti ck release button as shown below (button 3).
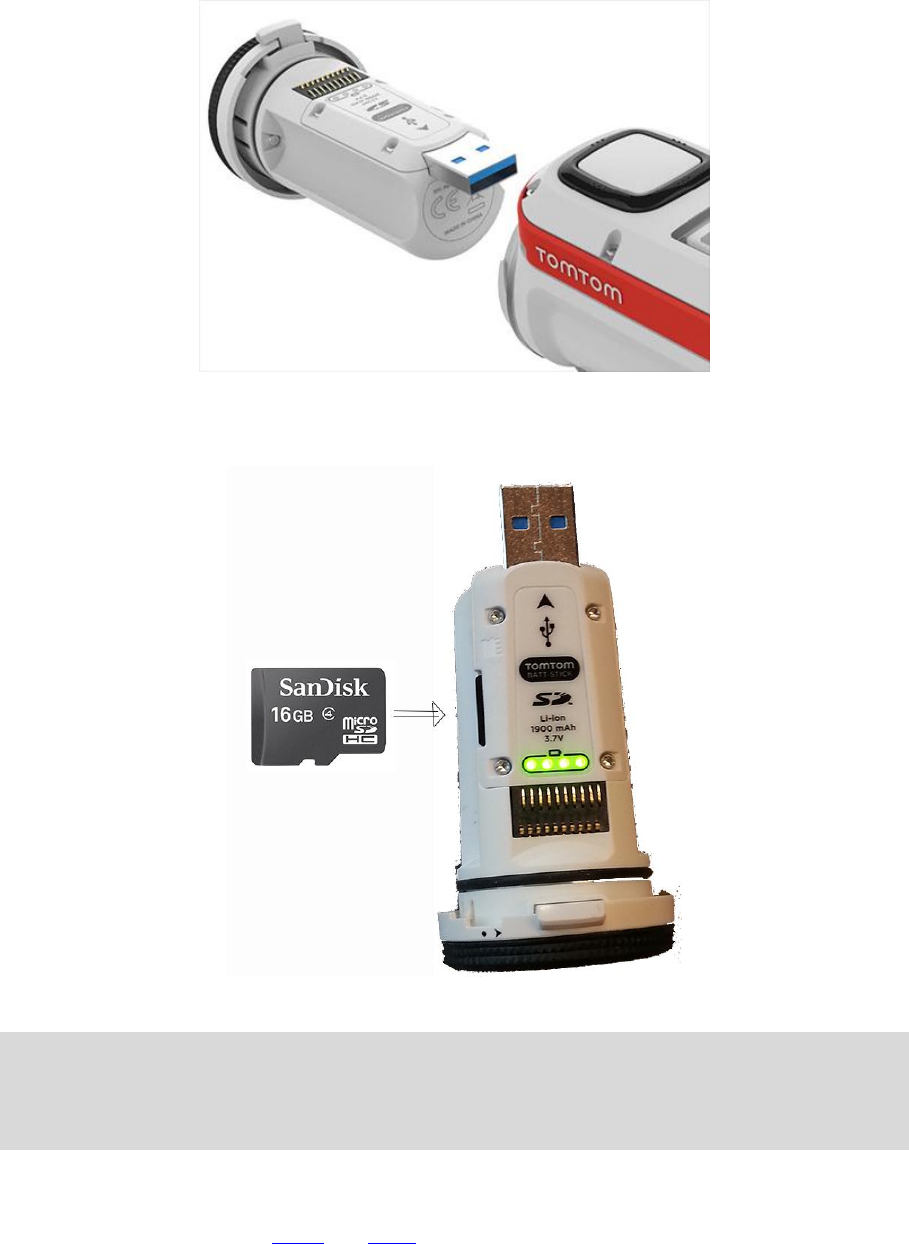
Turn the battery stick to remove it from yo ur camera.
Insert the micro -SD memory card into the memory card slot in t he battery stick.
NOTE TO GERRY: we n eed to replace this ima ge with a cleaner one :-)
Insert the battery s tick into the camera an d turn it until it locks.
Note : If you insert a mi cro-SD card that is too slow to wo rk with your camera, th e camera shows
you a message and yo u are asked to use a s upported micro -SD card .
Tip : Micro-SD cards ca n degrade over time , and performance may suffe r as the memory card fills
Camera modes
The camera has th e following photo a nd video modes:
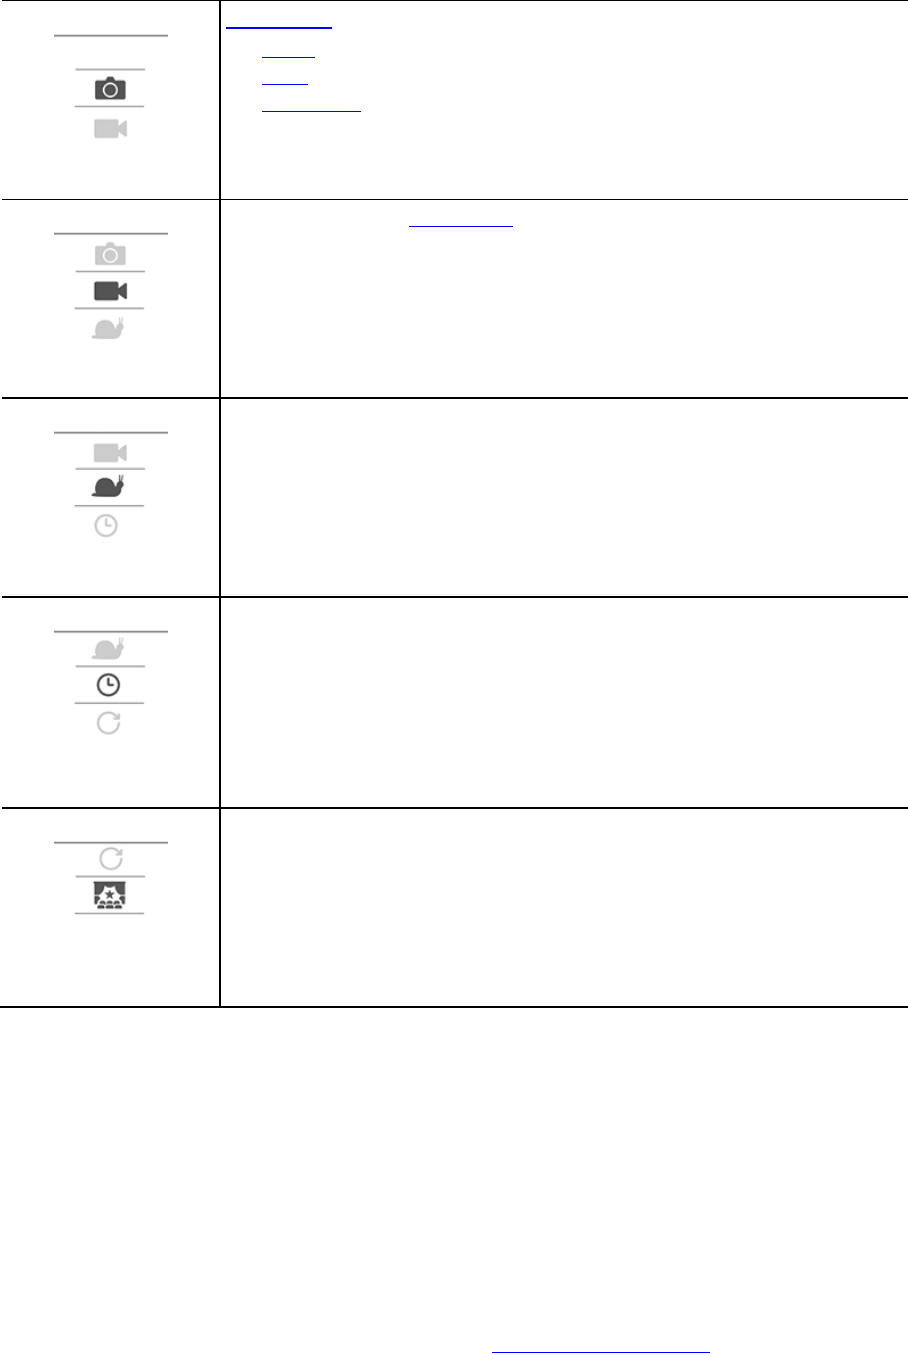
Photo mode has th e following options:
Single - For taking a s ingle photograph.
Burst - For taking a s eries of photos in a very shor t time.
Continuous - For ta king a series of photos a t a pre-set i nterval. This is
also called photo logging.
Normal high- quality video mode . You can set the video quality to 1080p or
720p, and the fram e rate to 30 f ps or 60 fps.
*** ADD LINKS TO GLOSSARY HERE for 10 80p etc ****
In SLOW MO or slow moti on mode, the camera r ecords at a multiple of the
normal frame rate (2x, 4x, 8x), but stores t he video with the norma l
frame rate (30 fps) for playback, which results in slow motion video.
Audio and sensor dat a are also recorded in t he slow motion mode. The
available slow motion rate depends on the vid eo resolution you choose.
When in TIMELAPSE MOD E, the camera recor ds a time -lapse video directly
as a video recording at t he currently set r esolution and at the norma l
frame rate.
You can choose the i nterval between recording . Time -lapse recording
stops when the batte ry level is low , when the memory card is full or when
you press the STO P button.
No audio is recorde d during a time -lapse video, but sensor informa tion is
CINEMATIC is the high est resolution mode , capturing video at 4K or 2.7K.
For normal use, you should find that 108 0p offers sufficiently hig h quality
Camera status
FOR REVIEWERS: What a bout certificatio n info? as per below for the Fi tness watch?
To see certificatio n information on your watch, mo ve down from the clock sc reen to open the
Settings menu.
Select Standards a nd then move right to s croll through the certifi cation information.
From the Camera Sta tus screen, move dow n to open the SETTINGS screen . Select STATUS th en
move right.
The status screen s hows the following info rmation:
Battery - the batt ery power left on you r camera. Cha rge the battery stick if th e power is low.

Storage - the amo unt of free space available on yo ur camera.
If you are running o ut of space, connect your cam era to your compute r. TomTom MySports
Connect transfers th e videos and photos to your computer.
QuickGPS - the sta tus of the QuickGPSfi x information on your cam era.
QuickGPSfix helps you r camera find your precise location quickly so that yo u can start your
activity. To update t he QuickGPSfix informatio n on your camera, connect your camera to your
computer. TomTom MySports Connect automa tically updates QuickGPSfix on your camera.
QuickGPSfix informati on is valid for three days after y ou download it.
These symbols are used to show the status of Q uickGPSfix:
QuickGPSfix on your ca mera is up - to -dat e.
QuickGPSfix on your ca mera is out - of -date. If the QuickGPSfix
information on your came ra is out - of -date, your camera still works as
usual. It may, howev er, take longer to get a GPS fix when you want to
start an activity.
If you see this icon, you are using a very ol d version of the software
and should update yo ur camera as soon as pos sible.
Version - the softwa re version number of yo ur camera. You may need this information if you
contact Customer Su pport. Every time yo u connect your camera to your comp uter, TomTom
MySports Connect checks if a software update is available for your camera .
Serial number - The serial number of your Ba ndit.
Sensors built in to your camera
Your Bandit has the fo llowing sensors built -in to the c amera:
3D accelerometer
Temperature
The sensors are use d for action metrics to show yo u full details of your acti vities on your videos and
photos. The data is stored with your videos a nd photos.
You can also use peripheral sensors , for example a heart -rate monitor, to enhan ce your action
An optional external mono microphone can also be connected to your camera.
Switching on and off
Your Bandit can b e on, off, or in standby. You can onl y switch the camera on an d off using the
buttons on the came ra.
Switching on you r Bandit
Press the START b utton (button 2) at the back of the camera for 2 s econds to switch your came ra
on. If no SD card is inserted into the batt ery stick, you are asked to inse rt one so that the came ra
can switch on.
The camera stays during any of the following:
1. The camera is recording a video or you are taking p hotos.
2. You are using the screen to set-up the cam era.
3. You are operating the cam era from your mobile phon e using Wi-Fi or Bluetooth.
Switching off your Ba ndit
Press the STOP butto n (button 1) at the front of the camera for 2 secon ds to switch off the came ra.
The camera can a lso be off during any of the fol lowing:
1. No battery is installed in t he camera.
2. The battery is empty. If t he camera is in on or in s tandby mode, it swi tches itself off if the
battery level gets to o low.
To save power the camera automatically switc hes to standby after a f ew minutes if it's not being
used. You can wake u p the camera by pressing the co ntrol button (button 5) or by using B luetooth
to connect to the came ra from your smart phone.
Resetting your camera
To reset your camera , do the following:
From the Camera Sta tus screen on your cam era, move down to open th e SETTI NGS screen. Select
GENERAL then se lect OPTIONS .
Select RESET to choose from two reset o ptions:
RESET ALL - resets yo ur camera to the fa ctory settings a nd restarts the camera.
Note : A reset does not delete your photos a nd videos stored on the memo ry card.
RESET WIFI - resets your Wi-Fi pas sword.

Receiving updates
Firmware Updates
Your camera may det ect a new firmware ve rsion on the mi croSD card after t he battery stick is
re -inserted.
The update insta lls and saves your last -used camera s ettings. When the updat e has successfully
installed the updat e, you get a message.
Note : If your camera cannot install the update b ecause, for example, the battery level is too low,
you are warned an d given instructions on how to fix the problem.
QuickGPSFix updates
In the following situat ions, your camera uses Quick GPSFix to help find you r position:
The camera isn't us ed for a long time.
The camera is o ut of coverage for more than on e week.
The camera is restarte d more than 500 km away from your previous positio n.
QuickGPSfix contains i nformation about satellite positions which helps you r Bandit find your position
Tip : QuickGPSFix informati on is stored in a separate f older from your videos and photos.
Your camera receives Q uickGPSFix updates w hen con nected to the DESKTOP A PP or when using the
MOBILE APP.
Caring for your camera
It is recommended tha t you clean your cam era once a week if you use it frequently.
Wipe the camera with a damp cloth as needed. Use mild soap to remov e oil or dirt.
Important : Do not c lean the lens or lens cov er with a normal cloth. Use o nly a cloth and spray
specifically made fo r cleaning camera lenses.
Clean the lens cove r and the lens using a c loth and spray specifica lly made for cleaning camera
Do not expose you r camera to strong ch emicals such as ga soline, cleaning solvents, aceton e,
alcohol, or insect rep ellents. Chemicals can dam age the camera's sea ls, case, and finish.
After using your camera i n water, rinse yo ur camera with tap wate r and dry it with a soft cloth.
Important : If you r emove the battery stick be extra careful not to let dirt or water enter t he
camera or the batter y stick. Only remove the battery stick in clean a nd dry conditio ns.
Using peripherals
Using the universal mount
You can mount your camera in ma ny places, for example on you r helmet or on the hand lebars using
the optional bik e mount.
EMAILED GAVIN FOR BETTER IM AGE
The universal mount kit lets you mount your ca mera on a helmet or oth er flat or slightly curved
surface. The kit co ntains the universal mou nt and two adhesive discs .
1. Attach the adhesive dis c to your chosen surface. Firm ly press it into place to e nsure full contact
over its entire surfa ce.
Follow these tips to ma ke sure that the ad hesive disc is secure:
Apply the adhesive disc o nly to a clean and dry surface. Wax, oil, dirt and mo isture reduce
adhesion, which can res ult in a weak bond.
Attach the adhesiv e disc in dry, room -temperature co nditions. The adhesive disc won't be
secure if you attac h it in damp and cold conditions .
Attach the adhesive disc only to a smooth and hard surface. The adhesi ve disc won't secur e-
ly attach to porous, tex tured or soft surf aces.
Regularly check the sec urity of the adhesive disc .
2. Attach the universal mou nt to the adhesive disc by fi rst fully opening the mo unt.
3. Push the mount onto the di sc at any yaw angle until you hear a click.
4. Fold down the camera p latform to any angle between 90 degrees to horizontal and fully c losed.
This locks the mo unt to the disc.
5. Mount the camera on th e camera platform.
6. Push down the lever to lock the mount.
Note : To remove th e mount, reverse the abo ve instructions.
Using the optional remote contro l
The remote control ca n be used to start a nd stop recording, and to ma nually tag your video . Use the
remote control wh en you can't easily or saf ely reach your camera.
You can hold the remote control in your han d, or you can attach it to a p lace y ou can easily reach .
Note : The remote uses Bluetooth Smart to co nnect to your camera an d can only be used wit h one
camera at a time .
Connecting the re mote control
1. From the Camera Status sc reen on your camera, mov e down to open the SETTINGS m enu.
2. Select GENERAL , then move right.
3. Select CONNECT , then mo ve right.
4. Select REMOTE , then mo ve right.
5. Move up or down to tur n it on.
Note : When conn ecting the camera to the remote control for the first time, any butto n press on
the remote contro l tells the camera that the remote control is out there and ready for conne c-
Tip : The Viewfinder of th e Mobile App also has re mote control features – see MO BILE APP.
The remote control ca n control up to 50 cam eras simultaneously from u p to 180m in optimal
conditions. It has a small LCD screen w hich mirrors what is shown o n the Camera Sta tus screen.
The remote control ca n only be used with on e camera at a ti me. If you want to connect yo ur remote
control to a different cam era, repeat th e instructions above with th e remote control in range of the
new camera.
Note : To change setti ngs on the camera using t he remote control, th e camera needs to be in
Wi -Fi mode.
Changing the batte ry in the remote contr ol ***THIS SECTION WA S MADE UP BY CLA IRE. ***
The remote control uses a button cell CR2032 battery.
To change the batt ery do the following:
1. Using a small flat-head s crewdriver, gently lever th e back off the remote co ntrol.
2. Gently lever out the rou nd battery cell.
3. Replace the battery with a new one.
4. Replace the cover and s nap it back into plac e on the remote contro l.
Using the remote control to record a movie
Press the START b utton (button 2) to start r ecording. The LED (3) blinks r ed when the camera is
Press the START b utton (button 2) to tag a ny exciting moments.
To wake up th e remote, press the S TART button (button 2 ) for 2 seconds until the LE D (3) blinks
twice in green.
Squeeze the remote , ie. press the STOP butto n (button 1) to stop recor ding. The LED (3) stops
flashing red.
Remote control st raps and mounts
The remote control is supplied a strap whic h will fit both around your bar e wrist and around a
winter coat during snow sports. Other straps a re available, as well as mounts for handlebars and
dashboards.
Tip : The remote control is waterproof to a dept h of 3 m.
FOR REVIEWERS: WHY IS THERE A CHARGING CABL E FOR THE REMOTE IF I T USES BATTERIES?
Using lens covers
The camera is wa terproof with the standard I PX7 lens cover (black and white). If you want to us e
the camera underwat er to depths down to 50 m, fit the opt ional IPX8 lens cov er (black).
Note : When using th e IPX8 lens cover, the mic rophone and baromete r are concealed and hence
don't work with this lens cover.
To remove the lens cov er, press the release butto n (button 4 below) and tu rn the lens cover.
To fit a lens cover, p ut the lens cover on th e camera lens and turn it until it locks.
Important : Store t he lens cover in its storag e bag when you are not usi ng it.
Important : To p revent damage to the camera lens, never use the came ra without a lens cover.
Important : Do not c lean the lens or lens cov er with a normal cloth. Use o nly a cloth and spray
specifically made fo r cleaning camera lenses.
Adding sensors
About sensors
Sensors are used by your Bandit to record data simultaneously with your video , audio or photos. This
makes it easier for you to find the highlights i n the video when reviewi ng it and adds context like
your GPS trace or a sp eed graph.
There are two ty pes of sensors for your came ra - built -in sensors and external s ensors.
Built-in sensors
For more information abo ut built-in sensors, see Sens ors in your camera .
External sensors
External sensors are ext ernal devices that you can lin k to your camera to prov ide extra information
about your activi ty.
You can attach an exte rnal heart rate monitor using a Bluetooth Smart (BLE ) connection. This sensor
measures your heart rate during your sport o r activity. The external TomTom Heart Rate Monitor is
available as an access ory.
Your camera tries to connect to external s ensors when recording sta rts and/or when you look a t a
Metrics screen. Whe n recording stops, or the Metrics screen is closed , the connection to the s ensor
is dropped.
Note : Your camera s tores a .GPX and a .KML file for each recorded vi deo. These files make i t
easy for you to access s ensor data directly using a co mputer. See Using KML a nd GPX file data -
The heart rate monitor
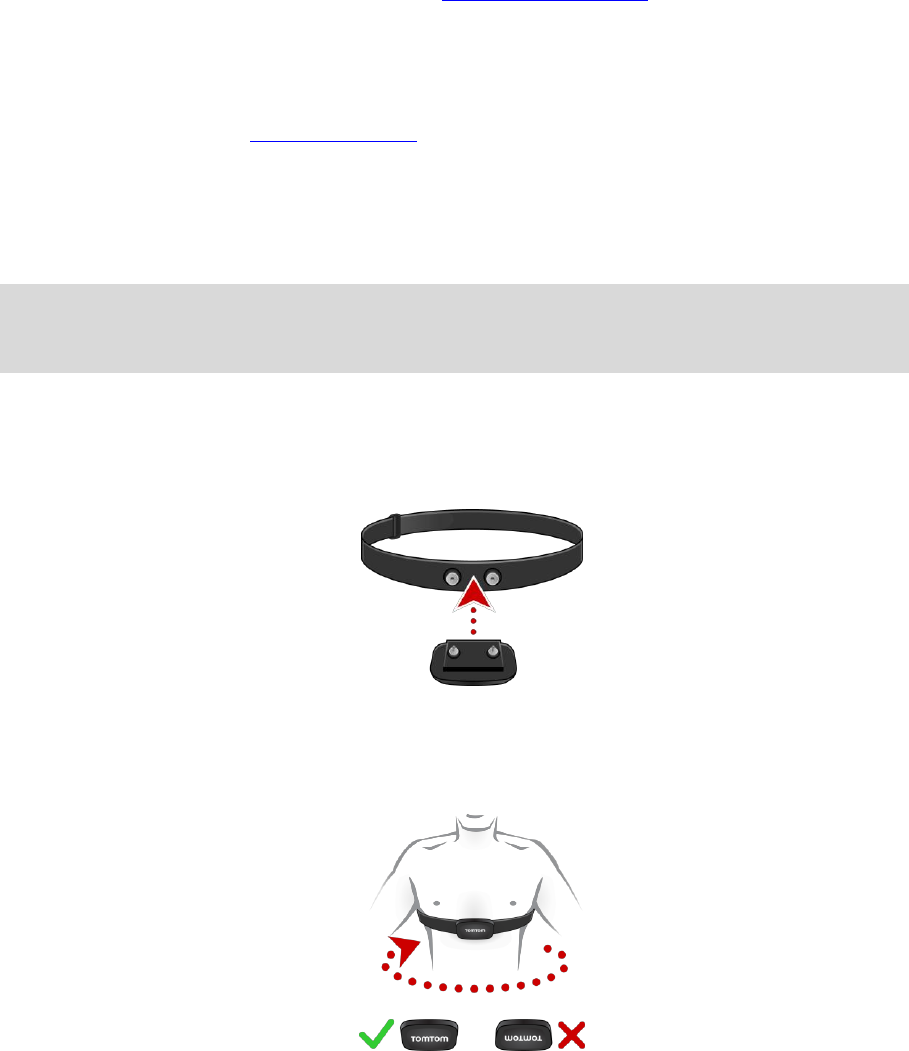
To use the exter nal TomTom Heart Rate Monitor with your cam era, do the following:
1. Attach the monitor to the strap.
2. Attach the strap around yo ur chest, so the monito r sits just above the base of your chest bone.
Make sure the monito r is the right way up so that the word 'TomTom' is th e right way up for
someone standing in fro nt of you.

Tip : Wet the sensors on the inside of the strap b efore placing it around yo ur chest. This makes
it easier for the monito r to pick up your h eartbeat.
3. From the Camera Status sc reen on your cam era, move down to open th e SETTINGS s creen.
4. Select GENERAL then se lect CONNECT .
5. Select SENSORS then mov e right.
6. Select HEART , then mo ve right to turn it on.
7. When you begin an activity, yo ur camera connects to the monitor and you se e a heart icon at
the top of the sc reen.
When your camera i s trying to connect to th e monitor, the heart f lashes.
The first time your came ra tries to con nect to your monitor, if it finds mo re than one monitor,
your camera does n't know which monito r to connect to. Mov e to a plac e where there are no
other monitors within range of your camera .
When you have conne cted to your monitor on ce, your camera always reconnects to yo ur mon i-
You can also use the external Heart Rate Mo nitor with other Bluetoo th® Smart Ready devic e s and
apps. See the docum entation that comes wit h your product or app for mor e information.
To change the CR20 32 battery on the monito r, use a coin to open t he back of the monito r. The
battery must be r ecycled or disposed of accor ding to local laws and reg ulations .
Note : The TomTom H eart Rate Monitor is not wa terproof.

Recording videos
About recording videos
You can use your Ba ndit to record videos in t he following modes:
VIDEO - Use this mod e to record normal high -quality videos .
SLOW MO - This mod e records slow-moti on videos at high -quality.
TIMELAPSE - This mo de creates videos from time -laps e recordings taken at set i ntervals.
CINEMATIC - Very high quality video mod e for the video specialist.
You can select t he mode usi ng the control button on the cam era, or you can use the Mo bile app.
Each video mode has i ts own range of settings .
About video modes
The different video mo des allow you to select a mo de that's perfect to record yo ur sports activity.
Video Mode Summa ry
The following table s hows the settings options a vailable for each video mod e:
Resolution
Capture rate
Field of view
Wide or Normal
Wide or Normal
Wide or Normal
Wide or Normal
Wide or Normal
Wide or Normal
1 every 5 sec
1 every 10 sec
1 every 15 sec
1 every 30 sec
1 every 60 sec
Videos are recorded usi ng h.264 encoding and au dio is recorded using AAC encoding (at 128kbps ).
The output is sto red as an MP4 file.
Sensor data is sto red with your videos.
In normal mode, th e camera records and stor es video at the same f rame -rate, in either 1080 p or
720p resolution, at u p to 120 fps. Audio, GPS and s ensor data are recorded. Aut omatic tagging can
be used, and you ca n manually tag your video .

Slow motion
A slow motion video is re corded at a multiple of t he normal frame rate , for example 2x, 4x, or 6x,
but the video is stored with the normal fram e rate of 30 fps fo r playback. A udio, GPS and sensor
data are recorded. A utomatic taggi ng can be used, and you ca n manually tag your video.
This camera records a ti me-lapse video di rectly as a video recording , using the currently set
resolution and at the "normal" frame rate. You can choos e the interval.
A time lapse video does not have audio recor ding. GPS data is recorded, but sensor data will not be
recorded. You can ma nually tag your video .
The Cinematic mo de allows you record vid eos at very high resolutions of 4k a nd 2.7k.
Recording a video
1. Go left from the Hub sc reen and select the mode for the type of video you want to record. Go
right back to the Hub screen.
Tip : To change settings fo r the selected mode, mov e down from the Hub screen to Settin gs ,
then move left to th e settings for that mod e.
2. Aim the camera at the s ubject.
3. Press the START button to start recording.
Tip : You can press the STA RT button at any time to m anually tag your video.
4. Press the STOP button to s top the recording.

Taking pho tos
About taking photos
You can use your Ba ndit to take photo s in the following modes :
Single - A single photo is taken.
Burst - A series of photos are taken in a very shor t time.
Continuous - A se ries of photos are taken at a p re-set interval (also called photo logging).
Photo Mode Sum mary
Resolution
Capture rate
Field of view
10 per sec
10 per sec
Continuous
1 every 5 sec
1 every 10 sec
1 every 15 sec
1 every 30 sec
1 every 60 sec
Photos are saved in th e JPEG/Exif format.
Taking single photos
1. Go left from the Hub sc reen and select Photo . Go right back to t he Hub screen.
Tip : To change settings fo r the selected mode, mov e down from the Hub screen to Settings ,
then move left to th e settings for that mod e.
2. Aim the camera at the s ubject.
3. Press the START button to take a photo.
Taking burst photos
1. Go left from the Hub sc reen and select Photo . Go right back to t he Hub screen.
Tip : To change settings fo r the selected mode, mov e down from the Hub screen to Settings ,
then move left to th e settings for that mod e.
2. Aim the camera at the s ubject.
3. Press the START button to take a photo burst.
The screen shows the number of photos ta ken.
Taking continuous photos
1. Go left from the Hub sc reen and select Photo . Go right back to t he Hub screen.
Tip : To change settings fo r the selected mode, mov e down from the Hub scr een to Settings,
then move left to th e settings for that mod e.
2. Aim the camera at the s ubject.
3. Press the START button to take continuous photos .
The screen shows the number of photos ta ken.
4. Press STOP to stop taking photos.
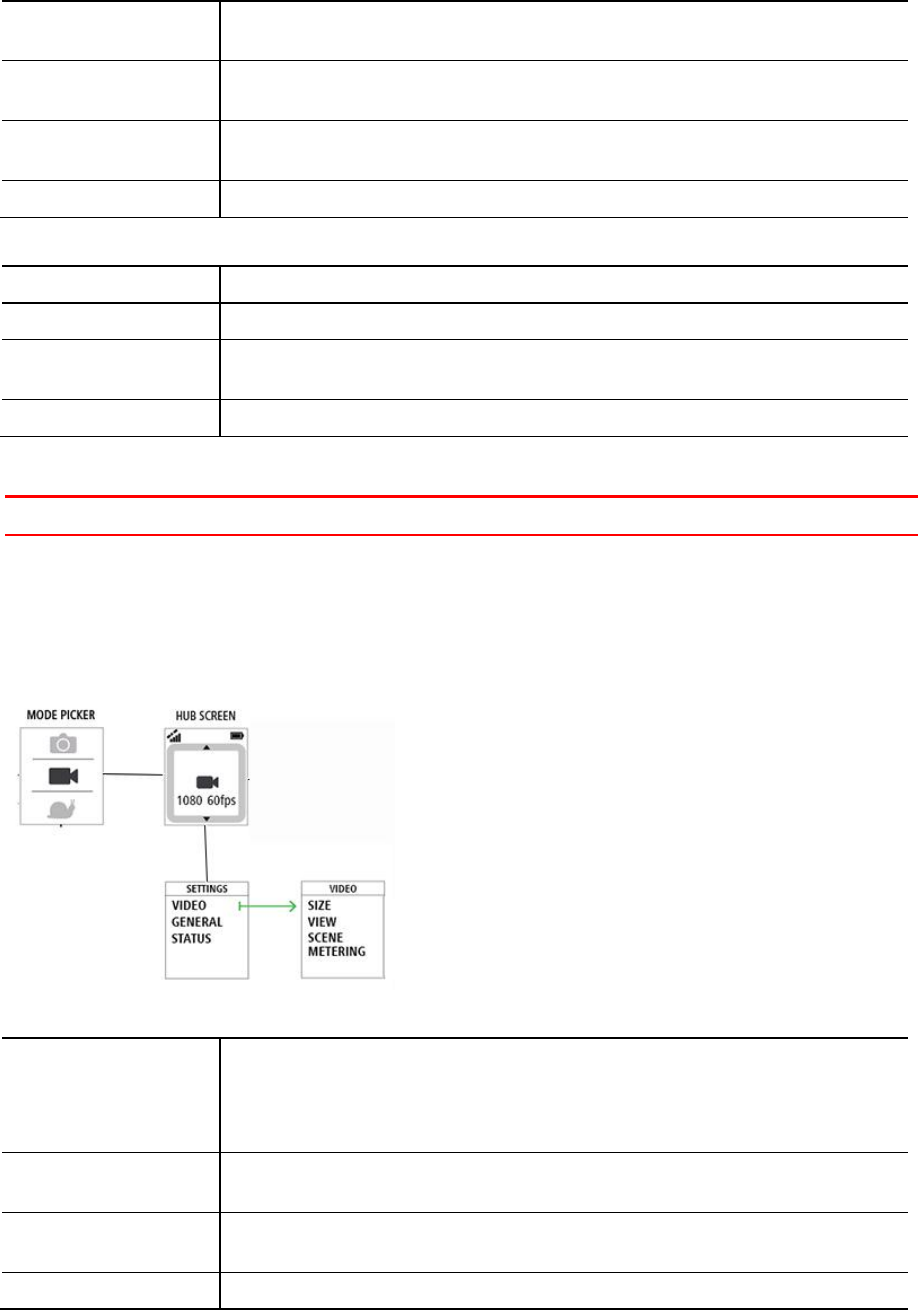
About settings
Important : You ca n also change a large rang e of settings using th e MOBILE APP on your sma rtphone.
To change settings t hat you use frequent ly such as the camera mode , move left from the Cam era
Status screen.
To access other settings that you may n eed to change less frequently, use the Settings menu. These
settings determi ne the overall behaviour of yo ur camera, and are us ed to adjust the mode setti ngs
for each photo and v ideo mode.
From the Camera Sta tus screen, move dow n to open the SETTINGS menu . The Settings men u has
the following items :
VIDEO or PHOTO - Use these settings to a djust the m ode settings for the Photo or Video mode
you have selected.
GENERAL - Thes e settings determine th e overall beh aviour of your came ra
STATUS - This scr een shows you the g eneral status of yo ur camera .
Photo and video settings
Each video and photo mo de has its own settings .
Important : You ca n also change a large rang e of settings using th e MOB ILE APP on your smartp hone.
Use the photo setti ngs to select a photo mo de. Once a mode has been c hosen, you can then se lect
settings for that p hoto mode.
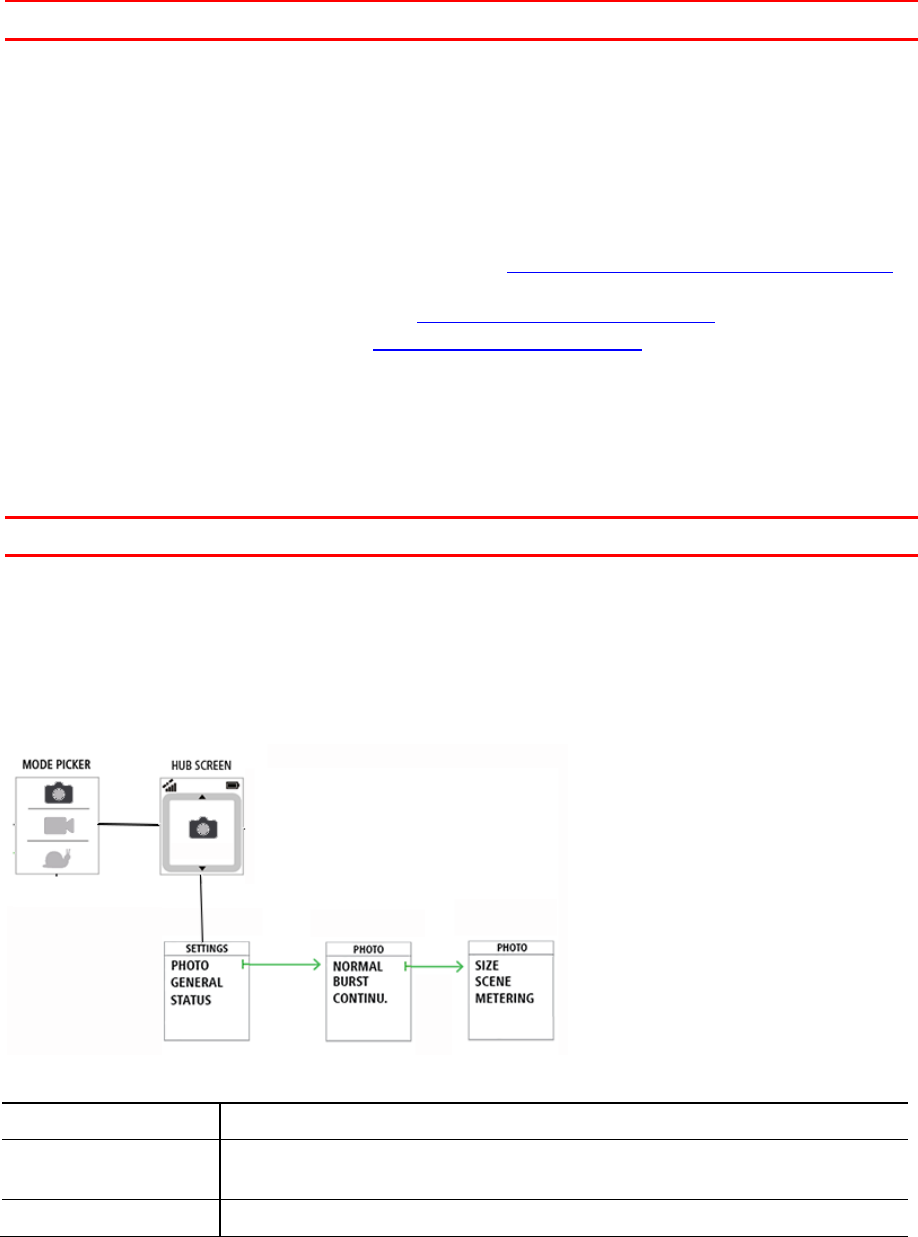
From the Camera Sta tus screen, move dow n to the SE TTINGS menu and se lect, for example PHOT O .
Move right to se lect a mode, for example BURST , the n select the settings you w ant to change.
THIS IMAGE WILL NOT BE USED IN THE FINAL BOOK AND IS INCLUD ED FOR AUTHOR and R EVIEWER
REFERENCE ONLY!
Normal settings
Preset: Sun, Cloudy , Mountain
Burst settings
10 per sec
Preset: Sun, Cloudy , Mountain
Continuous settings
1s, 5s, 10s, 15s , 30s, 60s
Preset: Sun, Cloudy , Mountain
Important : You ca n also change a large rang e of settings using th e MOBILE APP on your sma rtphone.
Each video mode has i ts own settings.
From the Camera Sta tus screen, move dow n to the SE TTINGS menu and se lect the mode settings,
for example VIDEO . Move right, then s elect the settings yo u want to change.
THIS IMAGE WILL NOT BE USED IN THE FINAL BOOK AND IS INCLUD ED FOR AUTHOR and R EVIEWER
REFERENCE ONLY!
Video settings
1080p at 3 0 fps
1080p at 6 0 fps
720p at 60 fps
720p at 12 0 fps
Preset: Sun, Cloudy , Mountain

Slo Mo settings
1080p at 2 x speed
720p at 4x speed
WVGA at 6x speed
Preset: Sun, Cloudy , Mountain
Cinematic settings
4k at 15 f ps
2.7k at 30 fps
WVGA at 6x speed
Preset: Sun, Cloudy , Mountain
Timelapse settings
1s, 5s, 10s, 15s , 30s, 60s
Preset: Sun, C loudy, Mountain
General settings
These settings dete rmine the overall be haviour of your camera.
Important : You ca n also change a large rang e of settings using th e MOBILE APP on your sma rtphone.
From the Camera Sta tus screen on your cam era, move right then move down to open the SETT INGS
menu. Select G ENERAL then select C ONNECT .
Use these settings to connect your came ra to your smartphone, a r emote control or externa l heart
Flight Mode
Important : You ca n also change a large rang e of settings using th e MOBILE APP on your sma rtphone.
From the Camera Sta tus screen on your cam era, move down to open th e SETTI NGS menu. Select
GENERAL then se lect FLIGHT MODE .
Move up or down to swi tch on flight or airplane mode .
To switch flight mo de off, move up or down again .

Tip : When airplane mode o r flight mode is switched o n, an airplane icon is s hown on the Camera
Status screen a nd all Bluetooth low energy (also known as BLE or Bluetooth ® Smart) connectivi ty
is disabled.
Important : You ca n also change a large rang e of settings using th e MOBILE APP on your sma rtphone.
From the Camera Sta tus screen on your cam era, move down to open th e SETTI NGS menu. Select
GENERAL then se lect OPTIONS .
Use these settings to select the general o ptions for your camera, s uch as language and units.
Select LANGUAGE to set the language used for menus and messa ges on your camera.
Select UNITS to set t he units to KM (metric) or Mi les (imperial).
REVIEW QUESTION : NO nautical miles for this release?
Select SOUND to s witch the buzzer so und on the camera ON or OFF .
When the camera is out of your sight, for examp le when mounted on yo ur helmet, the buzze r tells
you when the camera has started and stoppe d recordi ng, when the power is swi tched on or off, and
if a camera notificati on arrives.
You may wish to t urn the buzzer off if you need sil ence when recording, for exa mple, when riding
through a landscap e with wildlife.
Note : This setti ng does not control th e audio recordings made while videoing.
Select LIGHT to swi tch the LED lights on t he camera ON or OFF .
Tip : Switching the LEDs of f will save battery power.
Select RESET to choose from two reset o ptions:
RESET ALL - resets yo ur camera to the fa ctory settings a nd restarts the camera.
Note : A reset does not delete your photos a nd videos stored on the memo ry card.
RESET WIFI - resets your Wi-Fi pas sword.
Using the STORAGE settings you can d elete items from th e memory card a nd format the memo ry
Deleting the last fi le
1. From the Camera Status sc reen on your camera, mov e down to open the SETTINGS m enu.
2. Select GENERAL then se lect STORAGE .
3. Select DELETE LAST .

This selection delet es only the last file that was store d on the memory card .
Deleting all photos a nd videos
1. From the Camera Status sc reen on your camera, mov e down to open the SETTINGS m enu.
2. Select GENERAL then se lect STORAGE .
3. Select DELETE ALL .
This selection delet es all the photos and vid eos you m ade with your Ba ndit from the memory
Formatting the memory card
1. From the Camera Status sc reen on your camera, mov e down to open the SETTINGS m enu.
2. Select GENERAL then se lect STORAGE .
3. Select FORMAT SD .
This selection formats yo ur memory card.
Important : Forma tting a memory card del etes all files stored on t he memory card.
Tip : When a memory car d is formatted by the camera, the volume name is chosen by the
camera, for examp le "TOMTOMCAM" and you cannot change the name .

Glossary Term
Wi - Fi - 802.11n, Wi-Fi is in Wi-Fi Direct (or as a f allback ad-hoc) mode . Range will be minimum 10
meters and bandwi dth will be at minimum 10Mb ps.
Frames per second (fps)
Glossary of Terms

How TomTom uses your information
Information regarding t he use of personal informa tion can be found at tomtom .com/privacy .
FCC information for t he user
THE DEVICE COMPLI ES WITH PART 15 OF T HE FCC RULES
Federal Communi cations Commission ( FCC) Statement
This equipment radia tes radio frequency en ergy and if not used pro perly - that is, in strict
accordance with th e instructions in this manual - may cause interference to radio communications
and television receptio n.
Operation is subj ect to the following two con ditions: (1) this device ma y not cause harmf ul
interference and (2) this device must acce pt any interference, inc luding interference that may
cause undesired ope ration of the device .
This device has bee n tested and found to comply wit h the limits for a Class B di gital device,
pursuant to part 1 5 of the FCC rules. Thes e limits are designed to provi de reasonable protection
against harmful inte rference in a residential insta llation. This equipment ge nerates, uses and ca n
radiate radio freq uency energy and, if not i nstalled and used in accor dance with the instructi ons,
may cause harmful int erference to radio comm unications. However , there is no guarantee t hat
interference will not occ ur in a particular insta llation. If this equipm ent do es cause harmful
interference to radio o r television reception , which can be determine d by turning the e quipment off
and on, the user is e ncouraged to try to correct th e interference by one or mo re of the following
Reorient or relocate t he receiving ante nna.
Increase the separa tion between the e quipment and receiv er.
Connect the equipm ent into an outlet on a cir cuit different from t hat to which the receiver
is connected.
Consult the dealer o r an experienced radio/TV tec hnician for help.
Changes or modificati ons not expressly approv ed by the party responsib le for compliance could voi d
